
Ever feel like you have too much feeds to check every day?
Yep. I feel that too.
As someone who has tons of interests in different fields, sometimes there are days where i spent hours just checking my feeds. Cyber Security, Aviation, DOTA2, Girl’s frontline, homelab & self-host, etc. It’s quite a daunting task to keep up with wildly different topics at the same time. Admittedly, i’ve been looking for a simple solution that doesn’t require much maintenance to no avail. A few weeks ago, i came across Glance, a relatively new self-hosted dashboard app. Their tagline quickly got me hooked:
What if you could see everything at a… Glance
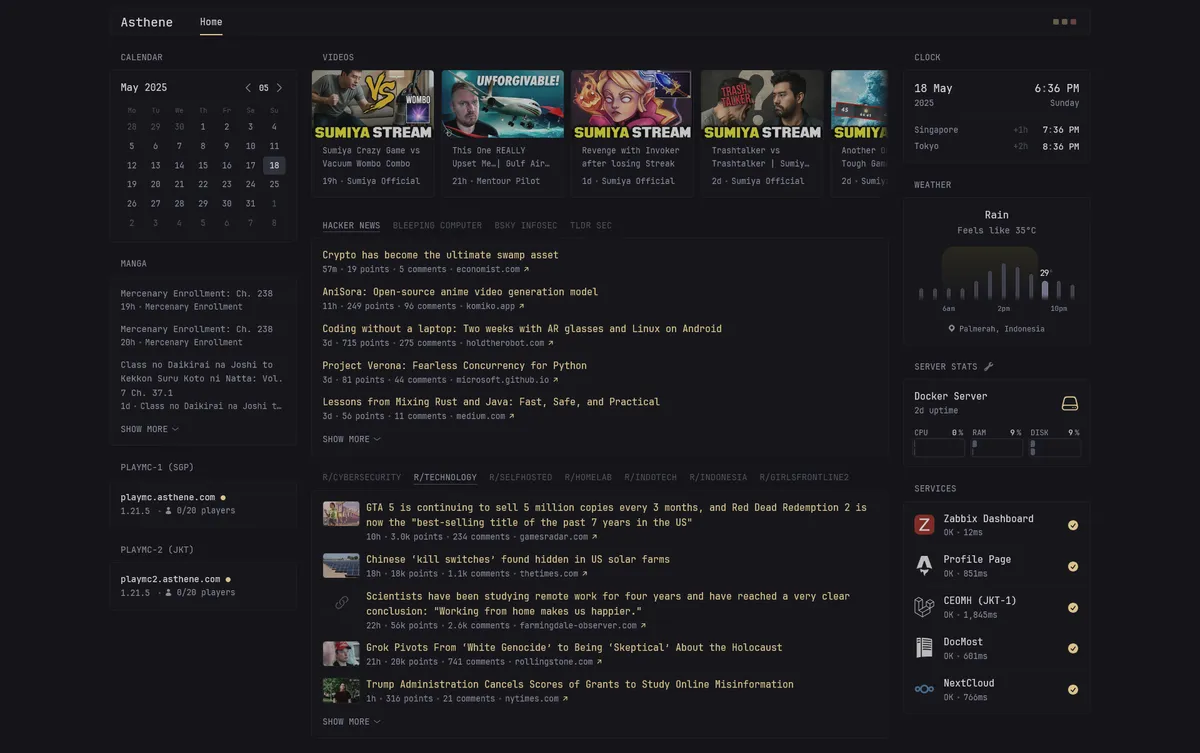
The idea is simple. Host an instance of the dashboard app by yourself. Then, you can start adding things you wanted to keep track as widgets. Here’s several things that’s available out of the box:
- Hacker News feed
- Subreddit feed
- RSS feed
- Youtube channels
- Twitch channels
- Server status (via ICMP ping)
- Calendar
- Weather
- Docker Container status
- Github releases
And many more. You can check the full list of available widgets here. There are even some community-made widgets such as minecraft server status, Cat as a Service/CaaS photos (yes, i’m dead serious), Nearby Aircrafts, etc.
Requirements
- Docker & Docker Compose
- Reverse Proxy, such as Traefik, Caddy or NGINX.
Not really mandatory, but nice to have for additional access control & port forwarding. I will use NGINX in this article.
Getting Started
I decided to use the recommended docker compose method. The app will be hosted on my own home server to ensure i have access to the same dashboard on every devices. Of course, you can deploy it on your local docker container, VPS, or anywhere else that supports docker. On this guide, i will also be using Portainer to simplify the container & stack management.
-
First, create a docker stack on the Stacks -> Add Stack menu.
-
Then, add the following
docker-compose.ymlfile content:
services: glance: container_name: glance image: glanceapp/glance restart: unless-stopped volumes: - /home/docker/glance:/app/config # change to your liking, this will be the location for glance config ports: - 5000:8080 # change to your liking. format is [external-port]:[internal-port]In the example above, i mapped the internal config to my home folder, /home/docker/glance, and expose the app on port 5000. This means that the Glance app will be available at <my-server-ip>:5000 later on.
- Navigate to your mapped directory, and create a
glance.yml. For starter, you can find the default template here. Simply paste the content to yourglance.ymlfile.
cd /home/docker/glance && touch glance.ymlwget https://raw.githubusercontent.com/glanceapp/glance/refs/heads/main/docs/glance.yml > glance.yml- And that’s it. You’re pretty much done. If you’re using Portainer, you can just click
Deploy the stackbutton. Or, if you fancy command line:
docker compose up -dSetting Up NGINX
This step isn’t really required, but i highly recommend it for easier access to your dashboard.
- Assuming you have NGINX, navigate to your config folder. Usually it is located at
/etc/nginx/sites-available/
cd /etc/nginx/sites-available/- Create a new config file, for example
glance:
sudo touch glance- Add the following content to your config file:
server {        listen 80;        listen [::]:80;
        server_name glance.docker.asthene.local; # change to your liking
        location / {                proxy_pass http://127.0.0.1:5000;        }}
You can change the server_name to whatever you like. I used glance.docker.asthene.local for this example.
- Test the NGINX configuration, and restart the service:
sudo nginx -tsudo systemctl restart nginxNow your Glance app should be available at your domain. For example, mine is available at http://glance.docker.asthene.local (obviously, it’s a local address so you can’t see it).
Configuring widgets
Now that you have the app running, you can start adding widgets to your dashboard. Don’t worry, you don’t need any sysadmin or devops knowledge to write the config file. It’s as simple as writing a word document.
For example, to subscribe to a RSS feed, you can add the following section:
widgets: - type: rss name: My RSS Feed url: [Some RSS feed URL] limit: 5The options are pretty much straightforward. name is the name that will show up on your dashboard, url is the feed’s url, and limit limits how many entries are pulled at once.
Or you can subscribe to several youtube channels and automatically fetch the latest videos:
widgets: - type: videos channels: - [Youtube channel ID] - [Youtube channel ID] limit: 5You can find the details on how to obtain the Channel IDs here.
Finally, simply set the default homepage of your favorite browser or app to the Glance’s URL. Now, you can start your day with a Glance (pun intended).